

API integration
Create an API key, verify your first call and connect CODEXIS AI Agent to your own program or automation platform.
On this page you create an API key and verify your first call. You need an active CODEXIS AI Agent licence.
The Codexis AI agent API plugs the agent into a program of your own. You ask from an automation platform, a script or an internal application, and collect the answer afterwards. All it takes is one API key pasted into the tool that should call the agent.
What it is for
The integration comes in handy when you want to plug the agent into a process that already runs:
- Automation platforms such as Make.com or Zapier. The scenario sends the agent a contract that arrived by email and writes the answer into a spreadsheet.
- Your own script. Once a week you push a batch of documents through and have the output stored.
- Internal applications. You add a "Review document" button to your records system or CRM.
The agent works with the same knowledge of law, the same skills and the same files as in the chat. Conversations started over the API show up in your history in the application, and you can carry on with them by hand.
Before you start
You need an active CODEXIS AI Agent licence. Without it you cannot create a key, and existing keys stop working.
Calls go to https://vm.codexis.ai, the same address you see in the example on the Use a key card in the application.
Every question sent over the API consumes credits just like a question typed into the chat, and it does so from the account the key belongs to.
Creating a key
- Open Settings and go to Communication channels.
- Switch to the API tab.
- If you have no key yet, you will see an amber-highlighted card reading "You have no API keys yet." Click it, or use the Create key button.
- Name the key after the tool you will use it from, for example
Make.com integration. The name is how you tell which key to revoke when you retire one of the tools. - Confirm with the Create key button.
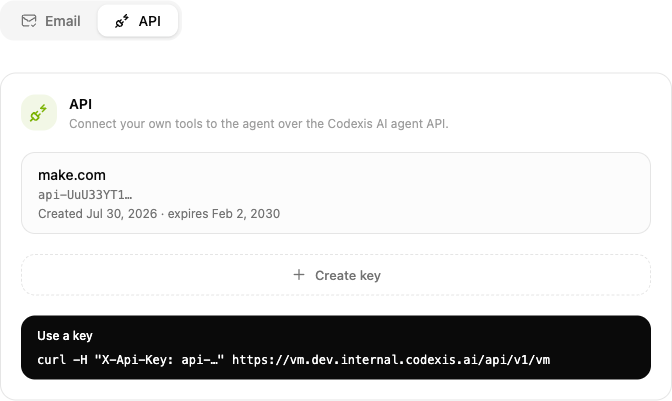
The key appears in the list and is spelled out in full right below it. It starts with the api- prefix.
The key is shown only once
Only its fingerprint is stored, not the key itself. Once you leave the screen nobody can read it back to you, not even support, and all that is left is to create a new one. The application therefore copies the key straight to your clipboard and says on the card that you only have to paste it with Ctrl+V. Should the automatic copy fail, use the Copy key button.
Paste the key straight into the tool you created it for, ideally into its secret store or an environment variable. It does not belong in source code or in a shared document.
How long a key lasts
For every key in the list you can see when it was created and how long it is valid, for example "Created 30 Jul 2026 · expires 31 Dec 2026".
The validity is derived from your CODEXIS AI Agent licence. The key works for exactly as long as the licence does:
- When you extend the licence, the validity of your keys moves along with it. The original keys stay valid.
- When the licence ends, the keys stop working and calls are answered with 401.
Authentication
The key travels in the X-Api-Key header. That is the whole of the authentication.
curl -H "X-Api-Key: api-…" https://vm.codexis.ai/api/v1/vmThe reply is the state of your virtual machine:
{ "status": "RUNNING" }This call is also the simplest way to check that the key works. Questions are processed by the agent on the virtual machine, so if the state comes back as STOPPED, start it with POST /api/v1/vm/start and wait a moment for it to reach RUNNING.
Handling errors
An error response always has the same shape, a code for your program and a message for a human:
{ "code": "NOT_FOUND", "message": "Chat not found: 6f1c…" }400, the request cannot be read.inputis missing, the file is empty, or the JSON is malformed. Fix the request body, retrying will not help.401, the key is missing, mistyped, revoked, or its validity ended with the licence. Check theX-Api-Keyheader and the key's validity in Settings → Communication channels → API.404, no conversation or message with this identifier exists, or it is not yours. Check thechatIdandmessageIdfrom the previous response.409, the agent turned the request down. Typically it is still answering the previous one, so wait for it to finish and try again. The same code is returned by starting or stopping the virtual machine when your account has none provisioned.500, a failure on the agent's side. Try again later, and if it repeats, contact support.
A 401 response also carries a WWW-Authenticate: ApiKey header and an empty body. It is a rejection before the request even enters the application.
Security practice
The key stands in for you. Whoever holds it can ask questions in your name, read your files and spend your credits. Treat it like a password.
One tool, one key. Do not use a single key for three different integrations. When you retire one tool, or its key leaks, you revoke exactly that one and the rest keep running.
Name the key after the tool. The name is the only thing by which you will recognise the key in the list. You will never see the key itself again, and the prefix tells you nothing on its own.
Never put the key in a URL. It belongs in the X-Api-Key header. In query parameters it would end up in the logs of servers and proxies alike.
Keep the key out of the browser. Calling from a web page or a mobile app means handing the key to every user. Call the API from your server.
Revoking a key
You cancel a key where you created it. In Settings → Communication channels → API, hover over the key's row and click the bin icon (Revoke).
Revocation takes effect immediately, every further call with that key ends with a 401. Your other keys and your everyday work in the application are untouched.
On any suspicion of a leak, revoke the key
If the key ended up somewhere it should not have, in a commit, a shared file or an email, revoke it and create a new one. There is no doing it halfway: as long as the key exists, it works.
For what the individual calls look like, see the endpoint reference.